

Dog tired as I try to bring the semester to a soft landing, I rely more and more on my student assistants to provide support in my research efforts.
I invited student research assistants Alison and Arianna to investigate the usefulness of Scoop.it.” as a teaching/learning tool. Here are their preliminary thoughts.
Scoop.it is a curating media web tool that allows individuals to find content for any topic imaginable. From these topics, it then creates an organized online magazine format. The components of Scoop.it are users, topics, and scoops. The potential users are anybody that has a Scoop.it account and can share articles about any topic. The topics can consist of anything, your favorite sport, a paper for school, current news events, and multiple endless possibilities. The scoops are the articles that are stored under the topic board/page for that specific topic. The free account for Scoop.it allows users to create two topic boards, connect two social media accounts, and scoop 10 articles a day.
To create a topic, one selects the “create a topic” button that is located on the user’s profile page. Once the button is selected, Scoop.it will then prompt you to fill out information about your topic. One inserts the name of the topic, selects the language, and then inserts a couple of key words about the topic. Inserting these key words allows Scoop.it to search for content that may be germane to your topic.
To find content yourself, a search bar in the top right corner allows one to type in keywords. The search will then produce three tabs related to the keywords; posts, topics, and users. The posts tab finds articles and content that is related to the keywords that were searched. Based on the keywords, topic boards that are created by other users will also be pulled up. If one wishes, one can follow a topic board which is then added automatically to one’s “follow” list. By following a topic board, one will be notified of the new content the user scoops into that topic board.
The topic board is a page that displays all of the curated content on the selected topic. In an organized fashion, the topic board arranges all the content you selected for that specific topic. By default, the content and articles are published in chronological order on the topic board.
When one finds an article that they want to scoop into their particular topic board, there is a scoop.it button on the article. This button allows one to select which curated topic board to add the scoop in, add additional text to the article, share this article with other social media sites, select a schedule of publication for the article, and add tags to the article.
Scoop.it allows individuals to share scoops with other social media sites without publishing the scoop under one of their topic boards. On the bottom right of a scoop is an arrow button that give you options of your other social media platforms to share the article with. Some versions of Scoop.it also provide the embedding code to include in a blog piece or to a website.
For convenience, Scoop.it has a web based platform and an app for mobile devices which syncs everything automatically across devices and platforms (e.g. desktop, iPad, iPhone, and Android).
There is an education version of Scoop.it that allows for 30 co-curators or groups to collaborate on a project. One is able to search for topics that may aid in papers, research projects, and class presentations. Teachers can create topic boards for a class and attach additional readings of articles that may enhance understanding of the material for the students. It can be used in conjunction with other learning tools such as SlideShare and PowerPoint.
We welcome any feedback or experience with Scoop.it.
Tag: student research assistants
A Student Guide to EverNote's Skitch Feature
A new learning tool that Dr. Simpson introduced us to recently is Skitch. From what we have discovered so exploring the capabilities of this app it is very useful for easily creating visual aids. You can take a screenshot or upload an image you already have. One can either take a screenshot of the entire screen (full-screen) or select what part of the screen will be in the screenshot (screen snapshot). You can edit the picture by adding arrows, highlighting, and adding annotations.Text boxes can be added to the images for further explanation. One can also add ovals, circles, or squares on the image to emphasize where you wish the reader to focus. The pixilate feature on Skitch allows one to blur out sections of the image. One can also use the “marker tool” to draw lines, words, or shapes on top of the image. The highlighter tool allows one to call attention to the main points of the image. Words that are highlighted will not be covered up by the highlighter but rather will be emphasized. Moreover, the highlighter, marker, text, and shapes can be customized with different colors, including red, yellow, blue, green, white, black, pink, orange, or even a customized color.
Once one has completed the image, the file can be saved in multiple formats including JPG, Skitch JPG, PNG, PNG Skitch, TIFF, GIF, BMD, and PDF. One can also share their image on social media such as Twitter, Facebook, and Flickr. In addition the image can also be saved to your computer, your Evernotes, or emailed to other individuals.
Here is a video that was created by Evernote illustrating some of the features we described above that one can use with Skitch.
We are in the process of making our own more detailed Skitch and Evernote student guide which will be included in our forthcoming e-book. Do let us know if you would be interested in it.
We would appreciate any feedback from personal experiences using Skitch or Evernote.
What Technology Learning Tools Should an Undergraduate Know? Alison Explores LinkedIn
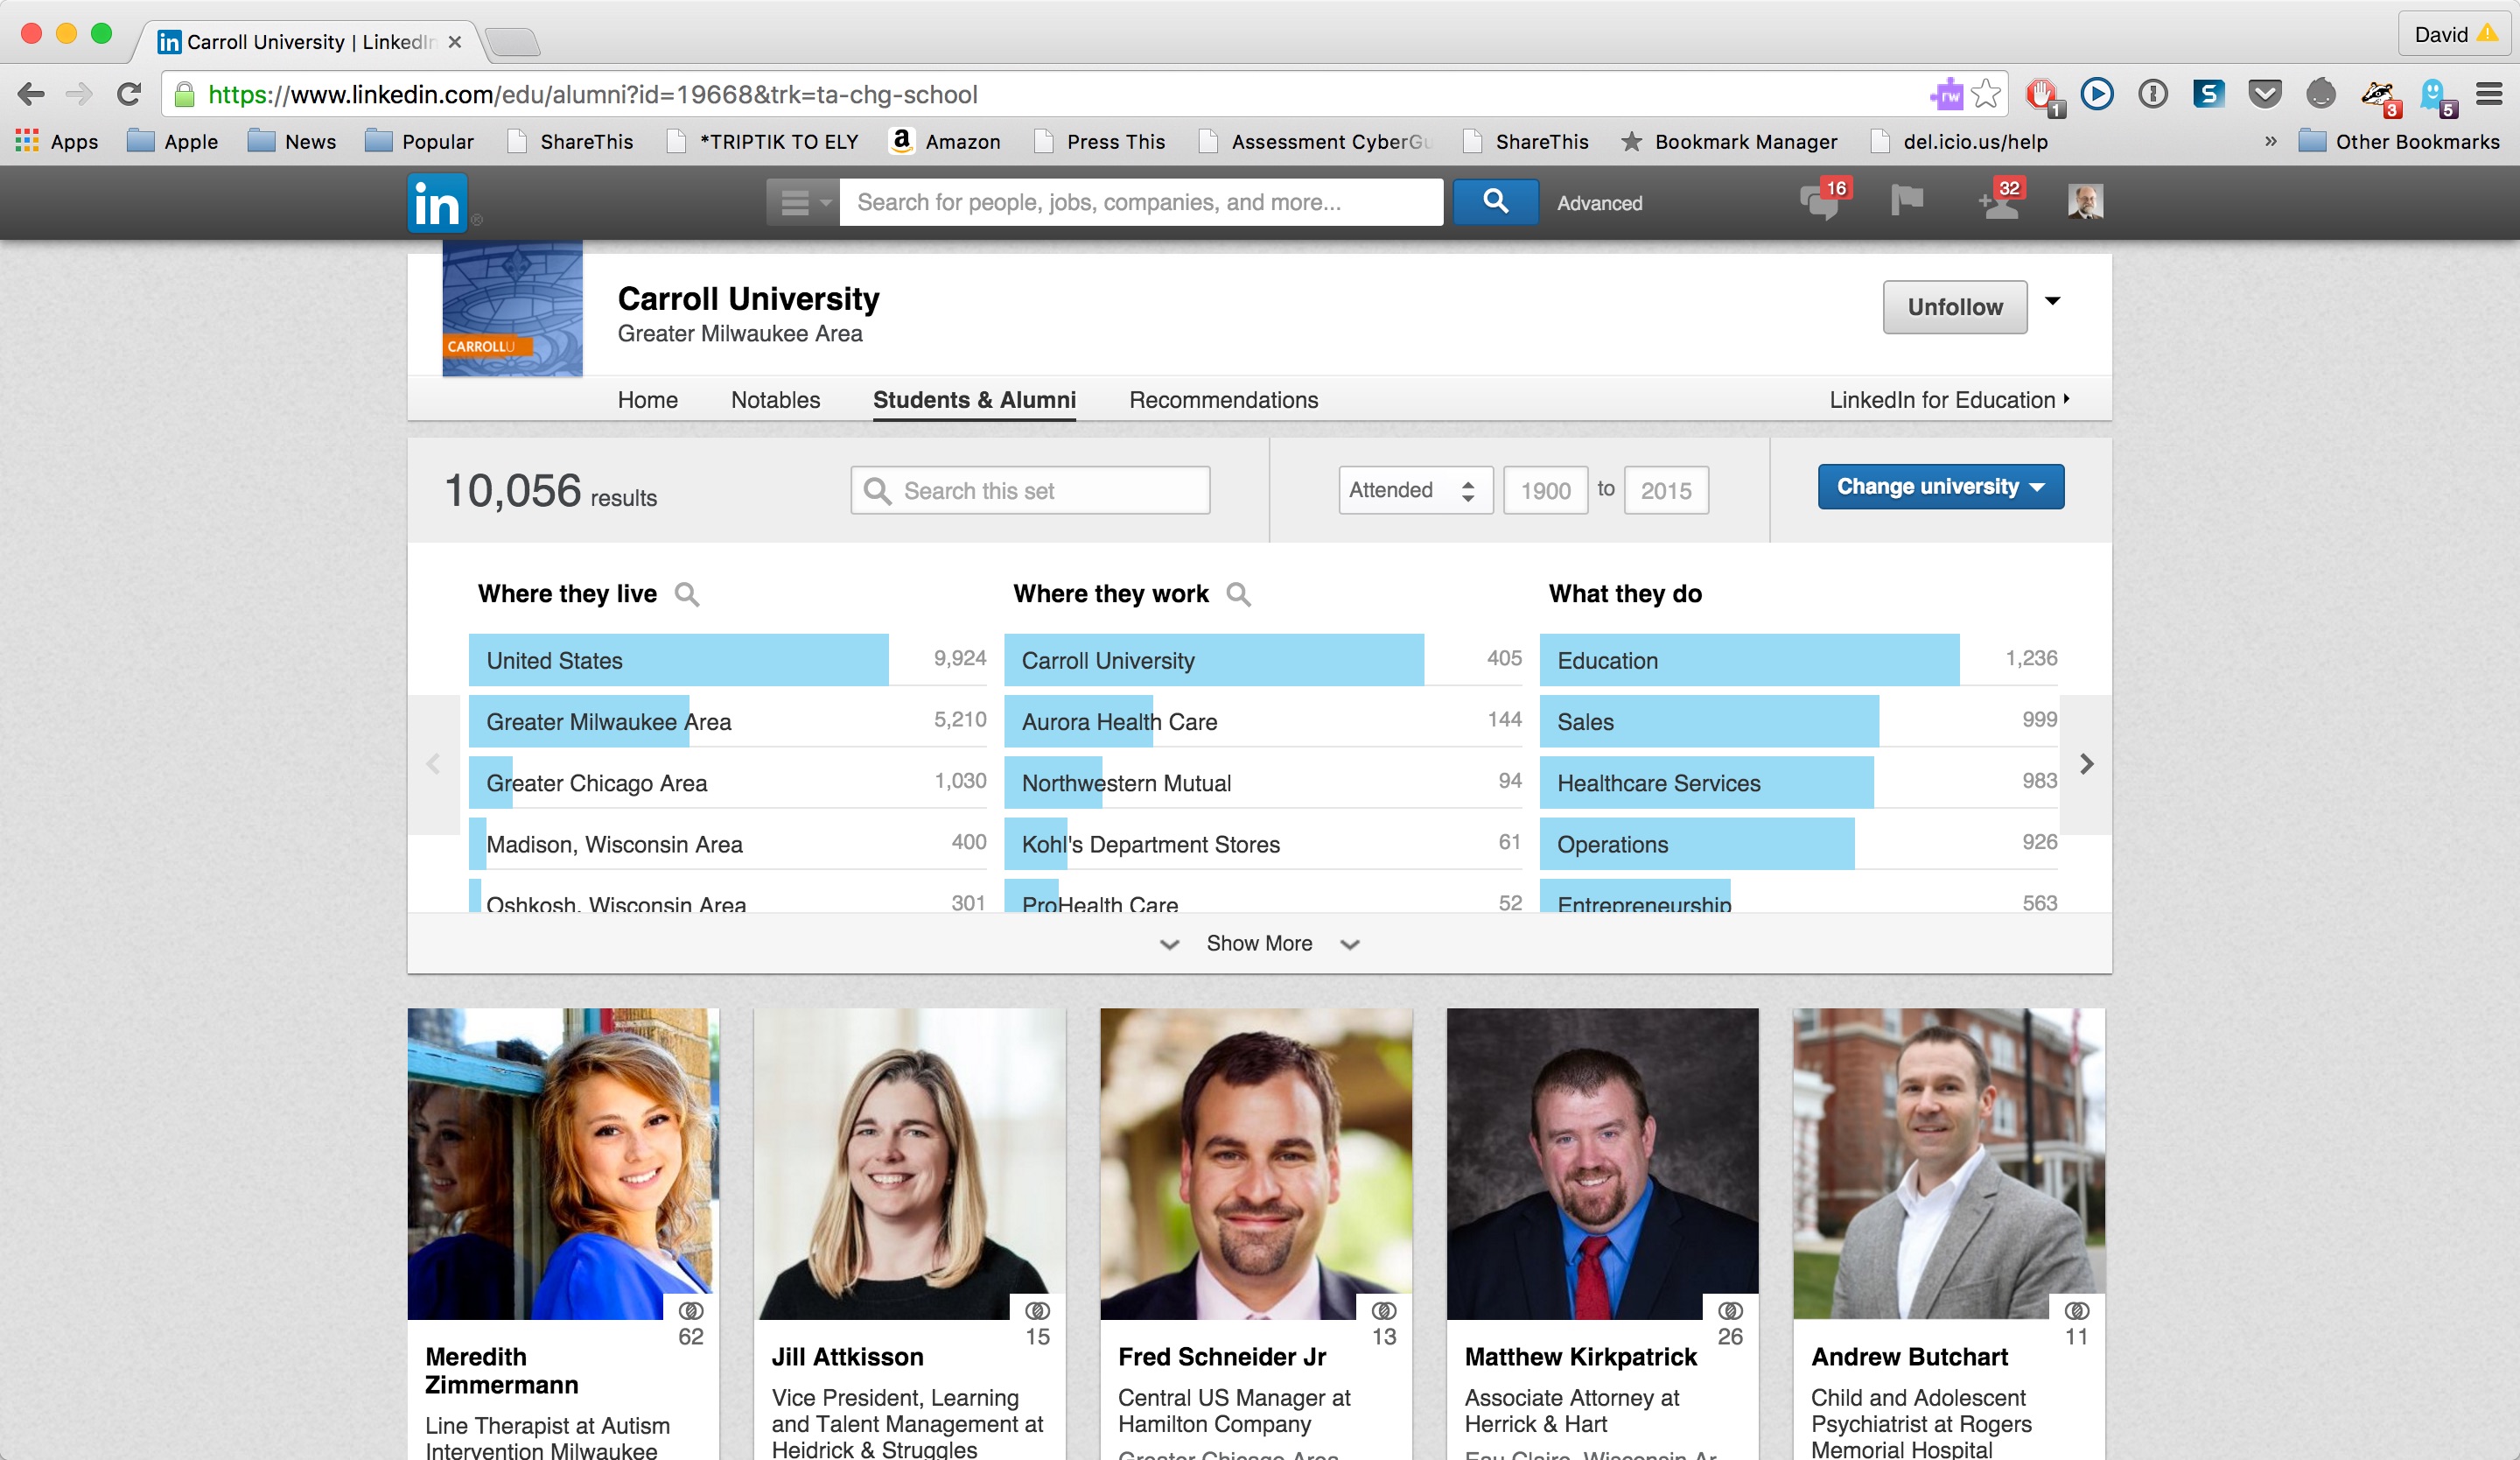
Rapidly growing and expanding, LinkedIn is a social network for professional collaboration that facilitates connecting with classmates, faculty, and colleagues. Users create an online profile and can provide as much information about themselves as they see pertinent. To this profile, users can add “connections” to other individuals and build their online social network. LinkedIn creates a profile comprised of an individual’s professional history, education, and achievements. Similar to a resume but in an online format, this allows other individuals to review your professional endeavors. Through LinkedIn, users potentially are more able to find jobs, locate other individuals in their field of study, and discover business and volunteer opportunities.
Individuals are able to build their image in their professional field by constructing and maintaining professional relationships. Especially for college students looking for connections in the real world, LinkedIn is a valuable tool for individuals searching for internships or for positions in one’s desired career path or to make connections with other individuals who may give them advice or guidance for their future.
To create a LinkedIn profile, an individual can go to the LinkedIn website and create their profile with an email address and password. An individual is then prompted to insert information about themselves such as a brief autobiography, past education experience, and professional work history. Additionally, individuals can enter volunteer experiences or organizations they care about, organizations they are affiliated with, certifications they have received, and a listing of their personal skills. LinkedIn will then organize all of the information onto a profile page. The user can customize where each section of information will fall (e.g. either at the top of the profile or lower down). Other individuals can also endorse the skills you have listed on your profile. This feature is a quick way for connections to validate that the individual is well qualified in the skills they have listed.
One should make a concerted effort to complete as much of their profile as possible. This includes adding a professional profile picture of oneself and even, if one chooses, adding a cover photo that will be displayed behind the profile. LinkedIn provides multiple sections of personal information that allow individuals to demonstrate and expand on who they are. Some of these sections are education, contact information, professional industry, volunteer experiences, and certifications. Completing all the LinkedIn sections both allows one to keep track of their experiences and accomplishments in their life and also helps showcase these talents and skills to other individuals. But remember, do not just throw down quick information to complete each section. Instead, think strategically about word choice and the way you want to communicate your information to others.
Once the profile is up and running, it is time to make connections. By adding connections with other individuals, others will be able to see and explore your profile. What kinds of connections should you make? Some individuals add anyone to increase their connection numbers. Others prefer to make connections only with individuals whom they personally know. The answer is really what you plan to do with these connections. If one simply has hundreds of connections but does not take advantage of what these connections could offer, it defeats the purpose. Connections help individuals stay in contact with old classmates, colleagues or friends, make professional connections for future jobs, receive advice from others in their field of study, explore connections of friends, and share information among groups. With the email address used to create a LinkedIn profile, LinkedIn will automatically suggest connections to individuals in your email list who have a LinkedIn account with that email. One can also look for connections by searching for their name, a company name, a specific industry, or a school name to make further connections. There are so many benefits that LinkedIn provides, but it is up to the individual to leverage how best to take advantage of these features.
LinkedIn also allows individuals to create a custom URL to their profile. The URL that comes with a profile is normally a group of random letters and numbers. In just a couple minutes, one can create a custom URL, such as their name. If the name is already taken, one can try to add a middle initial or add their middle name completely.
One way to get involved in LinkedIn is through groups. Individuals can join professional groups which share information, share advice among members, and post or search for jobs. Groups allow individuals to communicate between one another and to expand their knowledge. It is a great way to meet new individuals and make new connections. Anyone with a LinkedIn profile can create a group that can be customized to the topic they are interested in.
LinkedIn provides a free service but it also has an option for individuals to pay for more features. For college students, the free version of LinkedIn is a great way to put together an online resume but also get a start in exploring the professional world for after graduation.
What are your personal experiences with LinkedIn?
Top 100 Learning Tools 2015 Redux: My Student Research Team's Perspective

After learning more about the Top 100 Learning Tools by Jane Hart, we decided to revisit them from the perspectives of how we have been using the tools in our lives or how our opinions have changed about some of them.
One of the tools we looked at was Twitter. With our research team, we debated how Twitter was a useful tool for learning and what unique features Twitter offered. One of our research team members, Arianna, did a screen flow tutorial on how to create and what one can do with a Twitter account. (Click here for Arianna’s tutorial of Twitter.) Arianna explained to us the features of Twitter that she uses in her life. For example, she would use hashtags for specific groups or classes in school to communicate between one another. Also, she liked the feature of being updated with news stories from around the world to stay connected. We are learning more about the features of Twitter and how this tool impacts the lives of many individuals, but we have not yet implemented Twitter into our daily lives.
Another tool that we have been using on a consistent basis is WordPress. Through Dr. Simpson, our research team has been getting more experience with the its many components. WordPress offers a variety of features that are easy to use and it allows one easily to construct an eye-appealing website. Some of the features we find especially enjoyable are the ability to add pictures or videos to blog posts to create a visually appealing blog piece or to add additional information. WordPress has a simple format which makes it easy to locate many features such as adjusting font text or size, adding media, making the blog post private or public, and adding tags to a piece. Hyperlinks can also be added to the text on a blog piece to take the reader to an additional website. Hyperlinks can take the reader to a previous blog piece or to any website on the internet. Through working with Dr. Simpson, we have the opportunity to work with WordPress on a weekly basis and continue to find new features and improve our WordPress skills. (Click here for our initial thoughts about WordPress.)
One tool that we have explored and thoroughly enjoyed is iMovie. iMovie allows one to create a video of video clips, images, or audio recordings. Through iMovie, one can add sound to the video, such as music, a voice recording, or sound effects. An effect can also be used to fade out the end of the sound. Pictures can also be added into iMovie that can then be displayed over the video. This allows the audience to hear the video that is being played but see the image. The length of the view time of the image can be adjusted, and once the image is done being displayed, the audience will once again see the video. Some other features of iMovie include adding title slides into the video, inserting transitions from one clip to the next, and adding an end/credit slides. These credit slides can also be added on top of the videos so that the video shows with text. One can share your iMovie to YouTube, Facebook, and Twitter. We find iMovie to be a useful tool and we plan on using this tool for school projects, presentations, and for our research team. (Click here to see our quick tutorial on how to use iMovie).
A 3rd tool we recently have been learning and trying out ourselves is Evernote. Evernote allows you to create notes on your phone, computer, tablet or any device that can connect to the internet. These notes can be easily shared among these multiple devices so one can pick up where they left off on any of their devices. Even when not connected to Wifi, one can create and edit notes that will be synced automatically among all their devices once the device is connected again to Wifi. One feature of Evernote is making a notebook for a specific topic where one can store multiple notes and files under that topic. Evernote is useful when it comes to making to do lists for groceries, assignments, and setting reminders. Also, Evernote allows you to send pictures, notes, voice audios, and links to other individuals through a chat option. Content from multiple sources, such as web articles, photos, video, or notes can be saved in one place. This creates an easy way to save information in one folder instead of having the content in multiple locations. Evernote seems quite useful in the work setting for saving and sharing documents for collaborations and assignments with other members. We have downloaded the Evernote app for our phones and have been using the tool to share documents and ideas between members of the research team. (Click here to see our Preliminary thoughts on Evernote).
Tia has extensive experience using Google Drive. Here are her thoughts she shared about it based on her experience before she journeyed off to participate in NCAA soccer competition.
I have been using Google Drive since I was in middle school. From the beginning I knew this would be a great collaborative site. Even in middle school, we often used the presentation slides. The best feature about Google Drive, is that you can share it with as many people as you would like to help contribute to creating a finished presentation. It helps accommodate everyone’s’ busy schedules and creates the flexibility for all members to be able to work on the project when it is convenient for yourself. Another cool feature in Google Drive is that there are chat windows under each of your projects. This creates a team atmosphere when finalizing a presentation or even a group essay. By being able to chat without interrupting the actual information you are presenting, it creates a lesser chance of accidentally deleting vital information. Google drive has a security system on your documents. There are different options you can choose when sharing a certain document. You can both share it to someone and have them be able to edit whatever they want, or share it with someone as a read-only copy. Google Drive can also keep you very organized under your email account. You can also access any of your files and folders where ever you are, as long as you have Wi-Fi.
Google Drive is very similar to any of the Microsoft Word applications. The benefit of Google Drive is the ability to work with multiple people on multiple different computers at one singular time. A few things I never knew about Google Drive were you can share a document you create up to any social media site. Google Drive can also be changed into 65 different languages. There is also an activity bar where you can search and see how many times you or your coworkers have edited a specific Google document or slides presentations. One thing that I do not like about Google Drive is that it does not always have the correct formatting for you to accomplish APA or MLA formatting. Many times, even this year in college, I have gotten points marked off on a paper submitted through Google Drive due to having the incorrect indentations while citing sources. If I was using an actual Word Document, I could have easily bypassed this problem. With Google Drive, you just have to be more cautious when it comes to formatting. Even though Google Drive has many nice accessories, I would rather use a Word Document.
We are thinking of either writing a short book (Kindle version) or creating a mini-online course about how students can use these tools. Let us know if you might be interested in joining or contributing. We’d welcome learning from your experiences with these learning tools.
The Sounds of Carroll University

Dr. Simpson had the thought of making a video on the unique sounds of Carroll University. Alison and Lizzy decided to walk around campus taking recordings of sounds and pictures of the scenes. They decided to share their pictures and recordings using iMovie. Here is the video that they made.
Preliminary Thoughts on Evernote from Alison and Lizzy's Perspective
One of the Top 100 Learning Tools from Jane Hart that the research team wanted to learn more information about was Evernote. Each person individually made their own account to learn more about Evernote and share information.
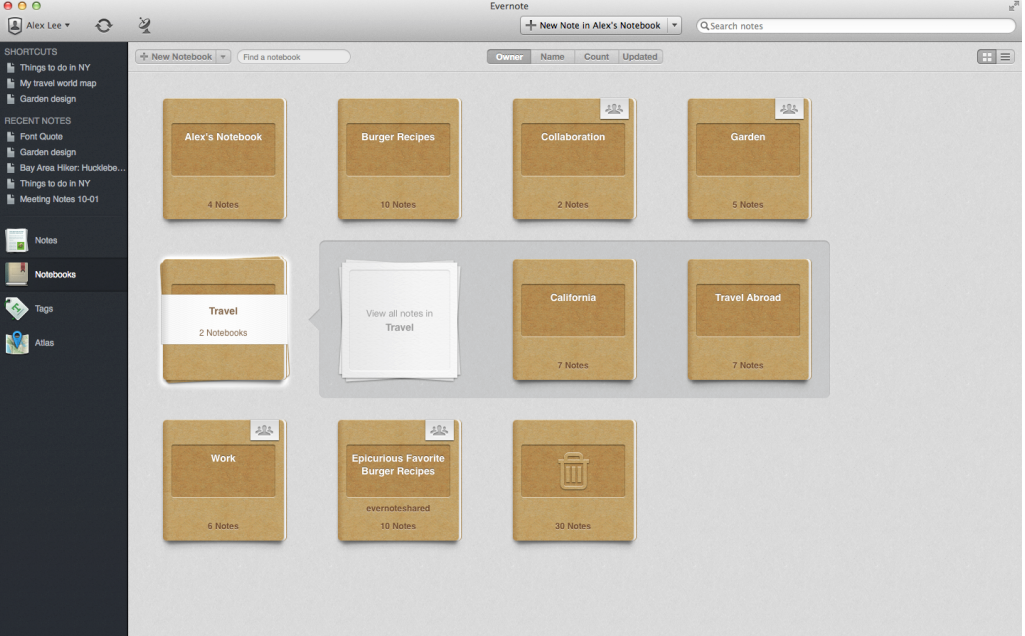
From what we have explored on Evernote so far, one can make to-do lists and gather information from classes, work life, or any other activities in a single folder. Evernote also allows individuals to attach photos or audio recordings to notes and share these files among colleagues, family, friends, or classmates. In Evernote, groups can also be created with other individuals to allow sharing between groups of messages, links, notes, or audio recordings. Using Evernote, one can take photos, record audio messages, set reminders, and send text messages. Evernote can also be accessed on any device. One is also able to create notes, take photos, or record audio messages without the need of Wi-Fi. Once the individual is reconnected to Wi-Fi, all the files will be synced to the notes and accessible on any device. Here is a link that we found with some helpful information to be a “master” of Evernote.
Evernote allows the ease of communication between individuals. For example, the research team has a group started on Evernote to collaborate information between one another. We can share photos, audio recordings, send messages, or share notes between one another. Evernote also allows individuals to set reminders for themselves, this can come in handy for meetings, classes, or sports practices. Reminders can also be synced to their calendar on their smart phone or the computer’s calendar. From our perspective, Evernote seems to provide easy access to its multiple features which are useful in our case with sharing documents between our research group of five individuals. On the other hand, we do not see using Evernote for our own personal use outside of the research team. Most of our notes from classes are hand written, we use other software programs to collaborate with partners on projects, and when composing videos or taking photos, we like to use editing software to edit our clips before doing anything with them.
Here are our preliminary thoughts on Evernote and we would love any feedback on how Evernote has impacted your lives in any shape or form.
What is the Role of a Faculty Adviser?
 I’ve been reflecting lately on my role as faculty adviser to undergraduates here at Carroll and about those faculty who played such a crucial role in that capacity for me. Without doubt their influence shaped how and why I relate to students and former students as I do.
At Oberlin College my most influential adviser was Ralph H. Turner. Ralph, the first faculty member to invite me to address him by his first name, somehow was able to provide me the right balance of challenge and support I needed both inside and outside the classroom. I fondly and respectfully remember him as intellectually curious, patient, playful, kind, and unusually generous in his time with me. Indeed he was willing to stay in touch with me even across the years that I was continuing my education at The Ohio State University. Thank you, Ralph.
I was blessed with a similar and even deeper rich and enduring relationship at Ohio State with Tom Ostrom, who was my adviser, research collaborator, mentor, friend, and role model until the day of his untimely death. Tom provided emotional support for me while I struggled with the likelihood of being pulled out of graduate school to be sent to Vietnam, listened to me as I sorted out my thoughts about getting married, wrote me a teasing letter about a study I should do if I ended up in jail, guided me in the transition from the intense research world of Ohio State to my current home at Carroll and inspired me to share with others my love of learning. His wisdom, lust for life, optimism, sense of humor, firmness, and candor still guide and humble me.
Both individuals so impacted my life in so many ways. I draw upon their wisdom each time I am interacting with a student in an advising capacity or with my student research assistants. Advising is much more than helping students make the transition from high school, providing advice in course selection, or giving guidance in deciding whether there is an afterlife after graduating from Carroll. The lessons taught me by Ralph and Tom aren’t and can’t be learned from adviser training workshops.
Arianna's Student Guide to Twitter
I’ve invited (required) my student research assistants to choose a technology learning tool and to write for me a “guide-book” explaining how the tool is useful to them as students. The guide-book must include hypertext links, a video, cross-reference some of my blog posts about these topics, and be germane to undergraduate students. Here is the first of this series. I am pleased and amazed by what they can do when given the opportunity. As always, feedback from the Internet community is welcomed.
—DS (AKA DumbleDave)
Social media is everywhere. Young, old, it does not matter, each of us seems to be involved in social media in one way or another.
So what about those of us who are not too familiar with certain social media tools such as Twitter? Well, I am here to help.
No, I am most certainly not a Twitter expert, as I only joined per the request of a friend, but I do know enough to get around. To start, you need to go to Twitter and sign up to create your own account. In creating your account you will have to decide on a Twitter handle (the name that comes after the @) and a display name (typically just your name). You can also add things such as your bio, where you are from, and your birthday. I, personally, try to avoid that sort of thing. Once you have those things completed, you can add an avi (your profile picture) and a header photo, but neither is required. Then, if you choose, you can make your profile private. A private profile simply means people must request your permission to follow you, cannot retweet you, and that people whom you do not approve to follow you cannot see any of your tweets, favorites, or pictures. Now that you have your profile up and running with as much, or as little, information about yourself as you would like, you can begin to follow people. Following people allows you to see what they are tweeting, whom they are following/who is following them, and what they are favoriting. Generally the people you follow are your friends, celebs you admire, newspapers or news stations you like, and so on. However following is not limited to just that, you can follow anyone in the world, really allowing people to expand their knowledge of current events and get connected with people they otherwise might never get connected with. Once you have followed a person, if they know you, they will typically follow you in return, giving them access to your tweets, favorites, pictures, and information.
Now that you are all set up with a profile, following a few individuals, and hopefully have a few followers of your own you can begin tweeting. Tweeting allows people to express what is on their mind, to tell their followers what they are doing, and further their knowledge. You also have the ability to respond to other people’s tweets. You are not limited to just words: tweets can also consist of pictures or videos. Once you have tweeted, people have a few different options with that tweet. Assuming your profile is not private, they can favorite your tweet (communicating that they like it), they can retweet tweet, or they can respond to it. You have all of these same options with other people’s tweets as well.
One really nice feature of Twitter is hashtags. When you tweet you can use a hashtag (or several hashtags) anywhere in that tweet and it will automatically generate a link that allows you to see every other recent tweet that was made using that same hashtag. This allows you to see what topics are trending—thus keeping you caught up on news and current events around the world. Hashtags might be used in a classroom setting. Professors might give their students a hashtag to use, allowing students from different sections of the course, and even students who are not in the course, to see what each other is saying. This usage in a classroom setting might lead students to generate ideas off of one another and help assist each other’s learning and success. In a recent update Twitter added a new feature called moments. Moments are like hashtags in that they let you see news, sports and entertainment and fun things that are being tweeted about as well.
One downside to Twitter, however, is the character limitation constraint. Tweets can contain no more than 140 characters, making rather thoughtful, grammatically correct tweets next to impossible. Dr. Simpson, who also disliked the 140 character limit and was initially slightly hesitant to the embrace the idea of Twitter shared his thoughts about Twitter here. Despite this limitation, I still find Twitter a fun and easy way to stay connected with people both near and far, to get your daily dose of news, and maybe even get a laugh at some of the memes circling the internet like this!.
Now that you have a Twitter account and some basic knowledge of the tool itself, I suggest just playing around and familiarizing yourself with it and seeing what you like and do not like and how it can be of beneficial to you. That is the way in which I learned all of my tips and tricks to Twitter.
Cascading Technology Learning Tools Into the Classroom: Student Authored Guides

Inspired by the release of Jane Hart’s latest 2015 Learning Tool Guidebook (well worth the purchase and careful reading), my students and I are in the process of writing Student Guides to the tools THEY find of most value at this point in their lives. Initially we’ll release them as blog posts. We welcome feedback. At the end of this semester we hope to bundle them together and post them as a Kindle-formatted e-book using a program like CreateSpace.
Further Exploration of Top 100 Learning Tools: Alison and Lizzy's Perspective
Dr. Simpson wanted us to go through Jane Hart’s Best of Breed (subsets of the Top 100 leaning tools) looking at ten tools we would like to learn about or learn better.
The first tool we looked at was under the category Blogging and Website Tools. The tool we would like to learn better is WordPress. We feel this tool is very beneficial because it would allow us better to collaborate and we can review multiple drafts created. Also, it publishes your writing into a neat looking format.
Under the category Quizzing, Survey, and Data Collection Tools we thought that SurveyMonkey and Quizlet would be very useful to learn more about. Quizlet allows teachers to create study guides online to actively engage students in learning. Students can also create an online study guide tailored to their idiosyncratic needs. SurveyMonkey is very useful and easy to use when needing to collect data or information. If you are in a club at your school, wanting to evaluate a teacher (or the school itself) SurveyMonkey is a good choice.
Further examination of Google Slides and PowerPoint, under the category Presentation Tools could provide useful information in the techniques of creating and making presentations. Most people don’t know all the features of these two tools nor the proper techniques to make an effective presentation. Google Slides and PowerPoint are very similar. However, Google Slides allows you to share your presentation with others who are able to edit it also. (Don MacMillan has created a “must see” guide about PowerPoint use).
A fourth tool we looked at was under the category Video Hosting and Editing Tools. The tools we thought would be especially beneficial to learn are iMovie and MovieMaker, two similar editing softwares but the former is for a Mac and the latter for a PC. These editing tools allow you to create video presentations, but offer many unique features to aid in creating special effects, voiceovers, and multiple other editing features.
The video below is one that we made to try and test out our skills using iMovie after having watched this tutorial by Katy Poult.
Skype, under the category Webinar/Meeting Tools, allows people to close the distance gap to communicate all over the world with other individuals. Also, a lot of employers use it to hold job interviews, conferences, or meetings. It would be really beneficial to learn all the unique features it has to offer and the proper etiquette for Skype.
In the category File Sharing Platforms, we thought Dropbox would be a useful tool to learn more about. On Dropbox, you can create grocery lists, graphs, and can access them on any device. We do not know much about Dropbox, but it seems to be a very useful tool to learn more about for school and our personal lives.
Microsoft Excel, under the category Spreadsheeting Tools is a very common tool that most people should learn more about. Excel has so many features which people don’t know about that could be very useful for school and work. Excel allows people to compute formulas, create tables, and make graphs. (Here is a tutorial of some Excel features by Dennis Taylor).
Gmail, under the category Email Clients, is a very popular tool at Carroll, but there are many features that you are able to do on it that we were unaware of. One is the capability to chat with friends or colleagues and to put your daily events on a calendar that sends reminders. Also, Gmail has a sophisticated spam filter. Gmail also offers many apps that you can download on your device from your Gmail account.
The ninth tool we would like to learn more about in the category Search and Research Tools, called Google Scholar. This allows you to do more school related research with more reliable resources for your data. It also has a lot of filters that helps you narrow down to find exactly what you are looking for. It is beneficial for anyone to learn how to do a more professional search and is a good starting point to figure out what to be searching for.
The tool we would like to learn more about the most is the tool LinkedIn, under the category Public Social Networks. LinkedIn is a professional social gathering website where individuals can post their professional accomplishments, experiences, and volunteer activities. LinkedIn is an interactive website that compiles one’s resume and professional activities. Individuals can possibly get future jobs or future connections that will be beneficial to them in the future. Also, it would be very convenient to know the do’s and don’ts of creating a strong, successful LinkedIn profile.